1 Introduction Precision machining usually refers to machining with a dimensional accuracy of 0.1 to 1 μm and a machining surface roughness of Ra0.02 to 0.1 μm. Precision cutting machining technology is one of the most important basic technologies in the mechanical manufacturing industry. It can represent the overall level of manufacturing technology in a certain country. However, in most production processes, in order to obtain high machining accuracy, the cutting speed of precision machining is usually lower than that of conventional machining. For example, in the actual production, the cutting speed of precision-machined aluminum alloy parts is mostly around v=100 m/min. It is lower than the normal cutting speed of aluminum parts (v=200~300m/min). This leads to lower precision machining of precision parts, higher production costs, longer product development cycles and longer lead times. With the increasing application of precision machining, modern precision machining technology should not only achieve high processing accuracy, but also require high production efficiency and product qualification rate at lower processing costs. Therefore, it is of great practical significance to study precision cutting under high-speed cutting conditions. For this purpose, we used diamond tools in high-speed CNC lathes to perform precision cutting tests. By optimizing the cutting amount, we obtained a high-precision machining surface, and discussed the status of cutting tools, cutting methods (dry cutting or wet cutting), cutting amount and other factors. The effect of machining surface roughness. 2 High-speed precision cutting test test conditions Workpiece material: LY12 high-strength aluminum alloy, workpiece size Ø140 × 150mm. Cutting tool: 1 polycrystalline diamond tool: Ra <0.02μm after grinding, linear bevel be = 0.11mm; 2 natural diamond tool: Ra <0.02μm after grinding, circular tip re =0.9mm. Machine: Hawk 150 high-speed CNC lathe, cutting fluid for the special emulsion; Cutting amount: ap = 0.025 ~ 0.1mm, f = 0.005 ~ 0.02mm / r, v = 400 ~ 1200m/min. The roughness of the machined surface is measured using a computer-aided profiler to measure the surface roughness of the workpiece. The profiler performs a stylus scan on the machined surface, and the surface micro-level roughness information is output in the form of an electrical analog (voltage), and then a set of discrete surface micro-degrees of roughness data is obtained through sampling and A/D conversion, after being processed by computer-specific software. Print out the measurement results of Ra, Rz, Ry, s, and sm and the profile graph. 3 Influence of cutting conditions on the roughness of the machined surface. Effect of tool material, cutting edge shape and grinding quality Natural single crystal diamond has extremely high hardness and wear resistance, good thermal conductivity, low friction coefficient, and can sharpen sharp edges. High-speed ultra-precision cutting aluminum alloy ideal tool material. Artificial polycrystalline diamond cannot grind a sharp edge with r ≤ 1μm, so it is difficult to achieve the requirements of ultra-precision mirror cutting, but it can be used for high-speed precision cutting of non-ferrous metals and non-metallic materials, and the tool cost is much lower than natural diamond tools ( The price ratio of the natural diamond cutter to the artificial polycrystalline diamond cutter used in this test is 7: 1). In order to obtain a high-precision machining surface, the primary and secondary cutting edges of the diamond tool must be ground to a straight or circular transition edge (wiper). The linear wiper can theoretically obtain a lower machining surface roughness than the arc wiper, but it requires that the direction of the cutting edge is strictly consistent with the feed direction, so that the tool setting is more difficult; the arc wiper blade is easy to use and is easy to use. It is more suitable for machining high-precision revolution surfaces, but the tool manufacturing process is poor and the cost is relatively high. In this cutting test, the surface roughness values of the two diamond tools obtained under the same high-speed cutting conditions (v=800m/min, f=0.01mm/r, ap=0.01mm, plus emulsified cutting fluid) are shown in Table 1. .
Table 1 Surface roughness values obtained by two kinds of cutting tools Surface roughness parameters Polycrystalline diamond tools Natural diamond tools Ra(μm) 0.1068 0.0778 Ry(μm) 0.812 0.496 As can be seen from Table 1, artificial polycrystals with linear wiper are available. Compared with diamond cutters, the surface roughness Ra of natural diamond cutters with circular wiper edges decreased by 27%, while the Ry value decreased by 40%. In the subsequent cutting tests, the decrease in Ry values was large. It can be seen that the natural diamond tool can not only reduce the peak-to-valley mean value of the contour curve of the surface being processed, but also can significantly reduce the maximum height of the surface contour curve fluctuations. The reason is that the natural diamond cutter edge is more sharp, the cutting distortion is small, and the cutting edge is Boundary extrusion decreases. Therefore, in high-speed precision machining, the sharpness of the cutting edge of the tool has a more important effect on the roughness of the machining surface than the geometry of the tool transition edge. In high-speed precision machining, no matter what kind of diamond tools are used, the grinding quality (sharpness, integrity, finish, etc.) of the cutting edge and the front and back flank faces have an important influence on the roughness of the machined surface. Same as the normal cutting speed. Table 2 shows the machined surface roughness values obtained by cutting tests at different cutting speeds using polycrystalline diamond tools with different grinding quality in the cutting area (cutting conditions: v=500, 800, 1100 m/min, f=0.01 Mm/r, ap=0.05mm, linear bevel be=0.2mm, plus emulsified cutting fluid). From the test results, the effect of the grinding quality of the tool is very significant.
Table 2 Grinding quality of different polycrystalline diamond tool surface roughness tool grinding quality machining surface roughness Ra (μm) v = 500m/min v = 800m/min v = 1100m/min grinding (▽ 12) 0.210 0.180 0.235 fine Research (▽14) 0.109 0.102 0.132 Effects of dry and wet cutting methods When high-speed cutting aluminum alloys, dry and wet cutting methods have a great influence on the surface roughness. When dry cutting (especially when the back knife eats ap <5μm), the chips are thin flocculent. Due to the high cutting speed, the cutting surface and the bonding phenomenon on the processing surface are very obvious, indicating that the built-up edge is more serious at this time. In wet cutting (additive emulsified cutting fluid), the surface roughness is significantly improved and the same effect as normal speed precision cutting (lubrication) can be achieved. 4 Effect of cutting amount on surface roughness of machining When selecting high-speed precision cutting, the choice of cutting amount is the main factor affecting the processing quality and processing efficiency. Corresponding to different process conditions, cutting trials are needed to determine a reasonable amount of cutting. In this cutting test, based on the performance characteristics of high-speed CNC lathes, and for comparison purposes, the selected cutting speed ranges from 200 m/min to 1200 m/min for ultra-high speed cutting; the range of feed selection is 0.002 to 0.02 mm/. r; The LY12 aluminum alloy (with emulsified cutting fluid) is cut with a precision-ground synthetic diamond tool. With a preferred cutting amount, a high smooth surface with Ra=0.04 to 0.10 μm was obtained, ie, a machining surface equivalent to a ▽11 finish was obtained under cutting conditions 8 times higher than the conventional cutting speed. The following analysis of the impact of the cutting amount on the surface roughness. The impact of cutting speed Traditional precision and ultra-precision machining are mostly performed at lower cutting speeds. For example, when high-precision machining of LY12 aluminum alloy (Ra≤0.06 μm) is performed during production, the cutting speed is usually about v=80m/min. In addition, the operator's processing experience has higher requirements. In this cutting test, the effect of cutting speed v on the roughness of the machined surface is shown in Fig. 1.

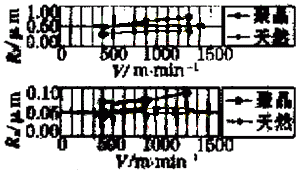
(f=0.02mm/r, ap=0.03mm)
Figure 1 Effect of Cutting Speed on Surface Roughness

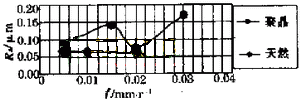
(v=800m/min, ap=0.03mm)
Figure 2 Effect of feed on the roughness of the machined surface

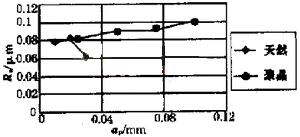
(v=800m/min, f=0.01mm/min)
Figure 3 The effect of the back knife on the roughness of the machined surface
Starting from v=400m/min, the machining surface roughness increases with the increase of cutting speed, but the changing rules of the two diamond tools are slightly different. When v=400m/min, the surface roughness value is the smallest, and the surface of Ra=0.04μm can be machined with natural diamond tools; when v=800m/min, the surface roughness of polycrystalline diamond tools is slightly increased. The increase in surface roughness of natural diamond tools is relatively large. When the cutting speed is increased to v = 1200m/min, the roughness of the machined surface of the natural diamond tool is lower than that when v = 800m/min. In general, low surface roughness can be obtained in the high-speed cutting area. With the increase of cutting speed, the surface roughness value does not change much. In particular, natural diamond tools are insensitive to changes in cutting speed. Cutting tests were performed over a wider range of cutting speeds while measuring cutting forces and vibrations. The test results show that when the cutting speed v=100m/min, the vibration of the machine tool and the workpiece is large, and the machining surface is rough (this point was also verified in the 45 steel cutting test); but when the cutting speed is increased to v When the speed is 400m/min (rotation speed n=910r/min), the vibration of the machine tool and the workpiece is obviously reduced, and the machining surface becomes smoother; while in the cutting speed range of 400 to 1200m/min, the vibration of the machine tool and the workpiece are both Small, smooth surface can be obtained. Obviously, under the premise of satisfying the requirement of precision machining (Ra≤0.1μm), the numerical control machining with the cutting speed of 800-1200m/min can greatly improve the production efficiency and automation level of precision cutting. Effect of feed rate In the cutting test, the influence of feed on the roughness of the machined surface is shown in Fig. 2. When the artificial polycrystalline diamond cutting tool cuts at a feed rate of f=0.015mm/r, there is a jump in the surface roughness value, and when the f=0.005mm/r and f=0.02mm/r, the machined surface roughness is not much different. When f>0.02mm/r, the machined surface roughness value will increase rapidly, indicating that the feed rate is not suitable for ultra-precision machining. When a natural diamond tool is cut at a feed rate of f<0.02 mm/r, the machined surface roughness changes very little. In order to obtain a highly polished surface, a very small amount of feed is generally used for precision machining. Tests show that when cutting with a small feed of f = 0.005 mm/r, the machining surface is very smooth and the built-up edge on the tool is small; when the f-value increases, the surface roughness of the polycrystalline diamond cutting tool follows. The height of the built-up edge changes, and the surface roughness of the natural diamond cutting tool hardly changes. This is because the natural diamond cutting tool has a sharp edge, a smooth blade surface, and a small coefficient of friction with the workpiece material, resulting in a product The tumor is very small. However, in the cutting test, it was also found that when cutting is performed with a smaller feed amount, the surface of the workpiece is markedly pressed and bonded, the surface roughness value is increased, and the machining efficiency is further reduced. From the test results in Figure 2, we can see that a reasonable feed rate should be chosen as f = 0.02mm/r. At this time, the same surface quality (Ra=0.06μm) as f=0.005mm/r can be obtained, and the processing efficiency can be improved. Increase by 4 times. The effect of backing on the amount of knife to eat back ap size has a great influence on the quality of the surface. Ordinary precision cutting generally uses a small amount of back eating. In the high-speed cutting conditions, the effect of the back knife on the roughness of the machined surface is shown in Fig. 3. As can be seen from the figure, there are differences in the variation of the surface roughness of the two diamond tools. With the increase of the back knife, the surface roughness of polycrystalline diamond tools will increase slowly. Within the range of ap=0.025-0.10mm, the surface roughness Ra≤0.1μm can meet the precision machining requirements. . Observations show that when the amount of back knife ap≤0.025mm, the built-up edge of the built-up edge does not change much, that is, it has little effect on the surface roughness; when the amount of back knife is ap>0.025mm, the built-up edge will follow the ap The increase in the value is due to changes in the cutting temperature and the bond area at the bottom of the built-up edge. Due to the sharp edge of the natural diamond tool, it is possible to use a smaller amount of back tool for cutting. It can be seen from the figure that when the ap is increased from 0.01mm to 0.02mm, the surface roughness variation is very small; when ap=0.03mm, the obtained surface roughness value is the lowest; and when ap<0.005mm, although the chip is extremely Thin, but the processing surface is not smooth, after analysis, this is because the edge radius r of the tool used in the test is relatively large. When the depth of the cutting layer is extremely small, the cutting is difficult and the squeegee is easy to occur, resulting in increased surface roughness. In order to make the processing surface smooth, the cutting process is stable, and the processing efficiency is improved. In other cutting tests, the amount of ap=0.03mm is adopted. 5 Conclusions Natural diamond tools and polycrystalline diamond tools can obtain a smooth surface with Ra<0.1μm in the high speed cutting range of v=400~1200m/min. Natural diamond tools can obtain Ra=0.05μm when v=1200m/min. The high gloss surface, while the polycrystalline diamond tool has the advantage of lower prices; under the premise of meeting the precision machining quality, there is a large selection space for the tool material, cutting amount and cutting conditions. Through the cutting test and analysis, the following conclusions can be drawn: The use of special emulsified cutting fluid in high-speed precision cutting can greatly improve the surface roughness, and achieve the same processing effect as the use of lubricating oil for conventional precision cutting. The surface quality of natural diamond tools is superior to that of polycrystalline diamond tools, which can significantly reduce the maximum height Ry of the surface profile fluctuations. However, polycrystalline diamond tools have cost advantages and can meet the requirements of high-speed precision machining with good economic benefits. The choice of cutting speed is mainly affected by the vibration characteristics of the machine tool and process system, and the cutting speed should be reasonably selected within the range of vibration with a small vibration. Within a certain range of values (f ≤ 0.02 mm/r), the change in feed rate has little effect on the surface roughness of the surface of the natural diamond tool, and a larger feed rate can be selected as much as possible depending on the machining efficiency requirements. Natural diamond tools can choose to use a relatively small amount of back to eat, but the use of the smallest amount of the back can not get the highest surface finish, through the cutting test to determine the best value of the amount of back to eat. For polycrystalline diamond tools, the surface roughness will increase slowly as the amount of backing tool increases, so a smaller backing tool should be used.

